Mule 4 comes with a brand new set of development kit, very integrated with Maven and Anypoint Studio. Why two SDKs? They are focused on different targets, so it’s important to know both of them and choose the proper one, depending on our goal.
Common concepts
Even if they are very different, as we’ll see soon together, they rely on the same core concepts: imagine a module as a bundle that exposes operations with a common configuration (if any).
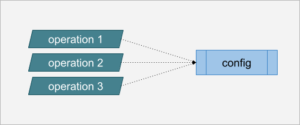
These concepts are familiar with all modules you have been using in daily work, for example, take the HTTP module:
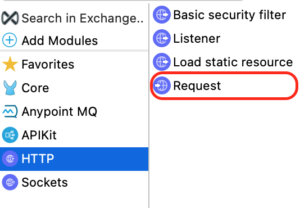
“HTTP” is the module name, while “Request”, “Listener” and so on are all the operations exposed: those can be a source (i.e. receive events at the beginning of the flow) or a processor (otherwise).
Each operation has its own input parameters (and of course a reference to the config, if needed). For example, the “Request” operation refers to a “Configuration” object that can be shared across all module operations. Then, you’ll find specific input parameters defined in the operation signature, represented in Studio like this:

Under this common surface, there are a lot of differences on what you can do with both SDKs.
So, when should I use the Java SDK or the XML SDK? You should consider that:
- XML SDK approach is very close to the classic flow definition you are familiar with. Think of an operation as a flow/subflow that implements a piece of logic that you want to share: normally, you could create a subflow to share logic within the same application to be DRY. That could not be enough when you want to reuse that login in another application. Yes, you could put a flow in a separate jar and import it with a flow-ref among projects, but, in my opinion, it lacks clarity, because you have to know in advance what are its expected inputs and its output. Encapsulating that flow in an operation (it’s almost cut/paste), you can define clearly what goes in and what goes out of that flow, and Studio will really help you with that. Please note that with this SDK you can only create Operation Components.
- On the other side, when you need to create a source component, a scope, or some operation that requires a lower level approach, with the Java SDK you can create almost anything.
These are the main considerations that should drive you to choose the proper SDK.
XML SDK
Let’s start with the approach you are most familiar with if you are a Mule developer: the XML SDK. To be honest, you should be actually familiar with the flow xml syntax, because Studio (now 7.8) drag & drop UI won’t help you here, neither during development nor unit test! As usual, Studio is Achille heel of the whole platform, but don’t let you down, there is a workaround.
The official documentation is well done, so we won’t go deep in development details: here I would like to share my experience using this SDK hoping to relieve some headaches.
The workaround is simple: if you are not very familiar with flow xml syntax like me, create a Mule Application first, then we’ll deal with the component later. If our module name will be “my-module”, we’ll call the application “my-module-tests”: it will be our module companion application.
Let’s make an example. First of all, design your flow in the “my-module-tests” project. For example, something like that:
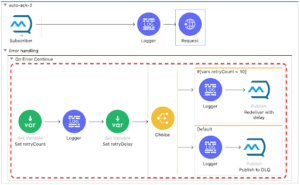
We are creating a flow that is subscribed to a queue and sends the message via HTTP to another system: if something goes wrong, the flow enqueues the message again with a delay, until a maximum retry.
This catching strategy could be reused among projects and it’s a good candidate for a xml operation. You can start writing your munit tests, mocking components and covering all the cases implemented by flow. Once done, you are ready to translate it in a new operation and all your tests should continue to pass (even the mocks pointing inside your module!!)
Now it’s time to create your new module via its Maven archetype: this is the most convenient way to get started with a basic module structure. Project scaffolding creates two operations for you and their munit tests: remove the tests (we’ll see why later) and prepare the operation to host your code, defining its input:
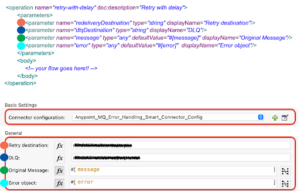
Here you can see how xml code is translated into UI when you import your module to Studio, so, design your input keeping in mind this relationship.
You can notice that:
- any new operation is enclosed in operation tags.
- inputs are parameters.
- body tag will host your code
Now you can:
- cut the code from your companion application and paste between body tags.
- import required modules as dependencies of your new module (Anypoint MQ in this case) in pom.xml
- add missing namespaces in xml header (copy them from the original flow, Studio won’t do that for you).
- launch mvn install on the module
- import just compiled module in your companion application as Maven dependency
The result is simply a new flow design like that (with a fancy icon too, if you define it):
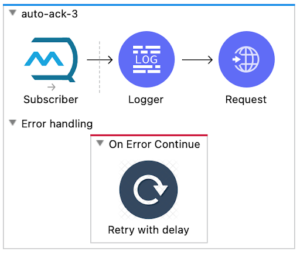
The complexity of the flow now is hidden behind a clear, simple and reusable “Retry with delay”, with clear inputs (we have no outputs here, but we can define one if we need).
What about the connector configuration? That’s very simple too: since the operation will enqueue the message again, we need to configure the Anypoint MQ connection:

<property name=“brokerUrl” type=“string” doc:description=“Broker URL” />
<property name=“clientId” type=“string” doc:description=“Client ID” />
<property name=“clientSecret” type=“string” doc:description=“Client Secret” />
<anypoint-mq:config name=“Anypoint_MQ_Config”>
<anypoint-mq:connection url=“#[vars.brokerUrl]” clientId=“#[vars.clientId]” clientSecret=“#[vars.clientSecret]” />
</anypoint-mq:config>
As you can see, any property becomes an input field of your connector configuration, that you can reuse inside where you need (to the Anypoint MQ connector in this case). I know what you are thinking: no, you cannot reuse the connection defined in your app unfortunately.
Note that both properties and parameters can be accessed with a normal flowvar syntax.
Now you can start the application or fix munit if needed: it’s nice to discover that your mocks are still working even if mocked components are inside your module! That’s not true if you use munit inside the module itself 🙁
Warning: keep in mind that Studio caches every version of a module so, if you make any change to the module from now on, remember to:
- increase component version
- run mvn clean install on the module
- import new version in your companion app
- run application/munit tests
This is why it is convenient to design the flow and have it working before moving your code to a component.
Considerations
The module project created by archetype is very Maven centric (and that’s good) but won’t fit very well with Studio. This means that you can import other modules as dependencies (that’s great!) like a normal Mule project, but it’s better if you do it from your pom.xml directly.
If you import the module project in Studio, munit tests won’t even start and you won’t get any help from the UI designing your operations, this is why I use a companion project: I want to design with Studio as much as I can and I want to use munit and launch the specific test I want. Since using munit directly in a module project won’t work in Studio, you must launch them from the command line and mess with command line parameters to selectively launch a specific test: developing like this could be like hell.
So, to overcome these inconveniences, I usually create a companion Mule application that I will use to support development and unit tests, and wrap them in a multi module Maven project, so module and tests will live together in the same git repository with the same lifecycle and versioning, structured like this:
my-module-parent
|_ my-module (sdk xml based)
|_ my-module-tests (companion mule application)
Java SDK
Java SDK is much more mature than its XML counterpart: you don’t need any companion app for supporting development because tests are driven by JUnit: just remember that if you import this module in an app, Studio will cache the version, so any update soffers the same problem mentioned above.
If you keep that in mind, you won’t have any problem. Java SDK is well designed and makes a Java developer first class citizen using it, where you can leverage all the potentiality of a OOP language.
Even in this case, official documentation go pretty deep in details from its scaffolding via Maven Archetype to module structure:
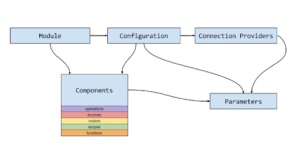
Let’s try to understand what these blocks are and how they are translated into code and UI in Studio.
Let’s create a module named “my-module”, the scaffolding will create for you this structure:
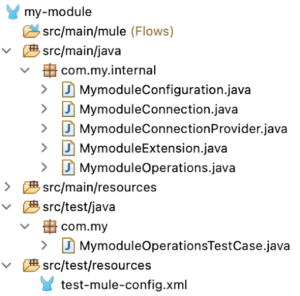
Here we can recognize concepts expressed above as class and as UI elements:
- Module: basic module entrypoint. This is mandatory


- Configuration: this is the connector configuration (not mandatory). Class fields (if annotated) may become Parameters, i.e. input fields in UI.
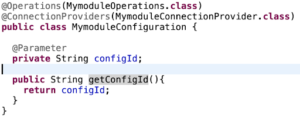
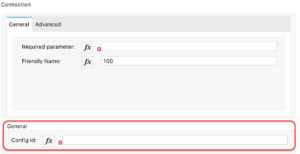
- Connection Provider: if you are developing a connector to an external system, it’s likely you’ll implement this factory of connections (of type MymoduleConnection in this case).
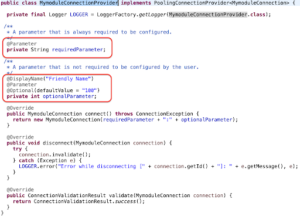
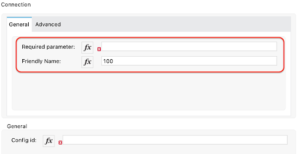
- Operation: this is one of the possible components managed by this module.


Depending on method signature, the operation UI panel may change.


Having in mind how your code will impact your UI experience on Studio, it will help and guide you on organizing configurations, connections or operations properly in your code.
The scaffolder generates a module with operations, but you can also create other kind of components, depending on your use cases:
- Sources: these are message sources, at the beginning of a flow. An HTTP listener or a message subscriber could be an example. You can implement this kind of component if you need to receive events from a system not covered by standard connectors.
- Functions: this is a special component that adds functions to your dataweave. Usually you can avoid this kind of component by using simply a DataWeave Custom Module (a simple jar with dataweave files in src/main/resources/modules folder or subfolders).
- Routers: like a choice component, you can create a strategy decision routing with your business logic.
- Scopes: acts like an interceptor (such as the try component), where you nest other components and have control at the beginning and at the end of the scoped block.
The documentation is very wide and covers a lot of points you may need during development. So, if you need a new Source component or maybe a wrapping another third party SDK within Operations, Java SDK could be the right choice.
Conclusion
We explored both SDK provided by MuleSoft, trying to emphasize some gotchas that you may encounter during daily work: at the end of this post I hope you will be able to choose which SDK to use for your specific task and move your first steps more confidently.
Andrea Como

